
Please accept my apologies and condolences if you're on a low-carb diet or have a gluten intolerance.

Yeah, baby! I don't think I could exist without bread in my life. If I had to choose between never eating bread again or never eating chocolate again...
Hmm. I don't know! Don't make me choose! Stop it! *shoves a ciabatta roll in your mouth*
Anyway, have you been watching The Great British Baking Show/Bake Off on PBS here in the US, or did you watch the most recent season if you're in the UK?
Spoiler alert: there's an episode where the contestants have to make ciabatta bread. I learned so much from it! What a fantastic show! It's a lovely change from the fast-paced, drama-loaded Food Network competitions. Now I can make ciabatta bread like a pro, thanks to a few helpful tricks and tips that I learned watching the show. I also gathered some other tips from the interwebs and combined them all into one recipe to share with all of you carb lovers. Instead of a big bread, however, I always make rolls because, if you know me at all, you know that I prefer little things to big things. That came out weird.
Sorry about the insane amount of pictures today. A picture is worth a thousand words when it comes to step-by-step instructions, but Captain Overkill here went ahead and included the pictures AND the thousand words. It's a simple bread to make, but the instructions are eternal. Sorry.
Ready? Let's make some ciabatta rolls!
| Crusty Ciabatta Rolls Adapted from The Great British Bake Off Makes 12 rolls 500g (17.5oz / 3 2/3 cup) bread flour 10g ( 0.35oz / 1 1/4 tsp) salt 10g (0.35oz / 2 1/2 tsp) instant yeast 440 to 450ml (15.5 to 16oz / 1 3/4 to 2 cups) room temperature water You will also need a bit of oil for brushing and some extra flour for your work surface. 1. Combine the flour, salt, and yeast in the bowl of a stand mixer. 2. Gradually add about 2/3 of the water while mixing on low-speed using the dough hook attachment. Keep adding water as needed until a sticky dough forms. 3. Knead at medium speed for six to eight minutes. Your dough should be fairly wet but not sloppy. It definitely shouldn't be dry and too firm. Slowly add water or flour as needed until you're happy with your dough. (Video below) 4. Brush a little bit of vegetable oil all over the bottom and sides of a large glass baking dish. Mine is about 16 by 10 inches. You want to brush plenty of oil on the dish so the dough will come off easily, but not too much that it makes your dough oily. Just enough to keep it from sticking too much. 5. Transfer the dough to the prepared baking dish and flatten it down with your hands. The dough will be sticky. You can use the tiniest bit of flour to help flatten it down. Use a dry-erase marker to draw a line on the glass to note how high the dough is. Cover the baking dish with a large cutting board or cookie sheet and a large kitchen towel on it for good measure. Let it rise at room temperature for two hours or until double in height. 6. When your dough is ready, dust your work surface with plenty of flour to keep your dough from sticking. It loves to stick to everything! This is also a good time to line two large, rimless cookie sheets with parchment paper. If you don't rimless ones, just flip them over and place the parchment paper on the bottom of the sheets. 7. Now comes the moment of truth. You want to flip the glass dish over on top of the floured surface, but do so very gently to keep from popping too many precious air bubbles. Use a spatula to gently separate the dough from the sides if it helps. 8. Sprinkle some flour all over the top and sides of the dough, not a ridiculous amount, but you can sprinkle quite a bit. Gently shape the dough into a rectangle. It should already be fairly rectangular, you just want to make it straight without handling it too much. Precious bubbles! 9. Now comes the part where you will curse my name. Use a very sharp knife to cut straight down your dough. The dough will want to stick to your knife, but you can sprinkle it with flour in between cuts. Cut the dough into 12 little squarish rolls. 10. If you didn't curse me before, you will do it now. Use your knife and a large, flat spatula to separate each roll from the others. This will be time-consuming because you don't want to pop too many bubbles, so take your time. I find that it's easiest to slide the spatula under a roll, and then in one motion cut down with the knife and pull away the spatula with the roll on it. It's tricky, but you get the hang of it after two or three rolls. 11. Place the rolls on the prepared cookie sheets and let them rise at room temperature for 45 minutes or until they are nice and puffy. In the meantime, slide a large baking stone (or two if you have them) into your oven and preheat it to 450 degrees F (230 C). The oven rack should be in the middle of the oven. 12. Gingerly slide the parchment paper with the rolls on top onto the hot baking stone without disturbing the dough too much. Bake your first batch of rolls for 20 to 25 minutes or until browned. Transfer your rolls to a cooling rack. 13. Repeat with the second batch and you're done! NOTES AND TIPS: - Keeping the dough from getting warm while it's rising is absolutely vital. If it's too warm it will rise too fast and the precious bubbles won't have a chance to... bubble up. - From the moment you've transferred the dough to the baking dish after kneading it, you should treat it gently like a delicate new-born kitten. - Your dough shouldn't be very hard and firm or the yeast will struggle to create those beautiful ciabatta bubbles. If it's too sloppy though, your rolls won't rise at all. Watch the slightly useful video below. - If you don't have a stand mixer you could knead the dough with your hands right inside the bowl, but only if you're Popeye because you'll have to go at it for about 12 exhausting minutes. And the dough will be very sticky and you won't be able to add flour to it because you'll make it too tight :( |
Let's see some pictures of the process, shall we? Let's start with a relatively useless video that shows how your dough should look while it's being kneaded. Not too dry. See how there's a bit of stickiness at the bottom? It's even stickier if the mixer is on low, which I should have done for this relatively useless video.
Now let's transfer the dough into a glass baking dish and draw a line with a dry-erase marker.

We let it rise, covered, until doubled in height...

Carefully and slowly flip it upside down onto a floured surface when it's ready...

Sprinkle four on top and cut into twelve squareish squares...

Separate each one and transfer them to your cookie sheet. Sorry about this sticky part...

Pretend my baking stone below is one of my cookie sheets. I am easily confused...

And 45 minutes later they should be all poofed up...

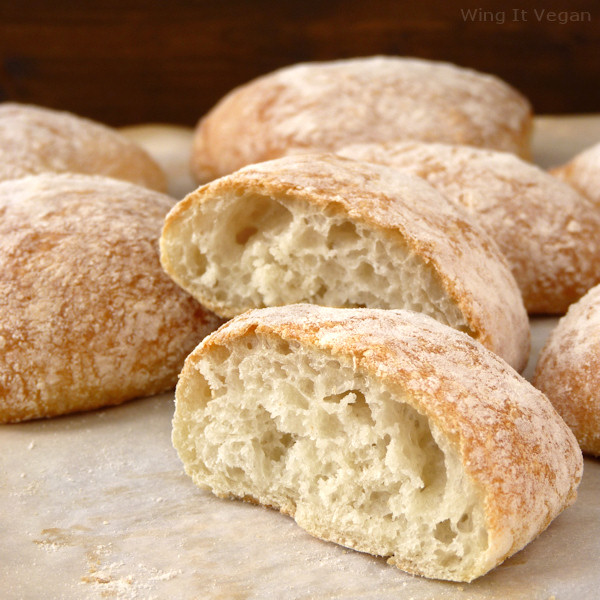
Bake until brown and crusty and enjoy!

Are you still here? I hope you get a chance to make them because these rolls are the dog's knees!
Or is it the bee's boll...
Hmm, I think I got my idioms mixed up.
"Ready, get set, bake!"
Ha, I am getting off my paleo regimen right now! These look absolutely perfect, River. I made my first ciabatta several years ago and was so proud of it. It was made with mome-amde sourdough starter. Then someone commented on flicker that the holes didn't have the right size. I still have to laugh about that because I don't care about holee, gimme that bread.
ReplyDeleteHa! The things some people say! I hope nobody comments on the size of my holes, or I might have to reply with a rude and inappropriate comment ;)
DeleteThe holes definitely not right
DeleteP.S. I have some white chocolate spread on my blog, that you can spread on your ciabatta. You can have it both!!
ReplyDeleteChocolate ON bread! Thanks for not making me have to choose!
DeleteI love what if scenarios! If I could only eat bread or chocolate for the rest of my life, I'd totally choose bread. My husband and I were playing "what if" the other day concerning wheat or soy. (Yes, we get all kinds of crazy around here…) If you could only have wheat or soy, which would you choose? I'd still go for wheat. I'd miss that seitan magic too much. And cinnamon rolls.
ReplyDeleteYour ciabatta looks phenomenal!
You crazy kids! Mr. Wing-It loves to play games of would-you-rather, but the choices he gives me are usually horrid and disgusting :D
DeleteYep. Wheat trumps soy. I do miss soy though. My body has some funky reactions to it so I can't have too much. I miss tofu scrambles the most!
YAY, the ciabatta rolls! They look totally awesome and I appreciate the step-by-step photos. Well done, again! :)
ReplyDeleteYou were the only one who actually voted, so your vote won! I had to leave out four or five extra step-by-step photos because the post was getting a bit epic. I don't know when to stop! :)
DeleteSay what?? Those rolls look PERFECT. I like making bread, but I'm not super great at it. I always eat it anyway, because i made it... but when I see perfect homemade breads like this, I get a little envious!!!
ReplyDeleteBut I've seen your homemade breads and they always look fantastic!
DeleteAhhh, these look just perfect!
ReplyDeleteThank you! I would still like to have a more "holey" ciabatta, but right now I'm pretty happy with it.
DeleteThese look so gorgeous! I am always wary of making bread, but I do have a lovely pink KitchenAide called Tessa and I bet she could help me out with this!
ReplyDeleteYes! Make Tessa earn her keep! Or the kittehs! They're naturally good at kneading stuff anyway. Give'em some dough and let them at it - as long as you don't mind eating hairy bread :D
DeleteAll my food 'may contain traces of cat fur'.
DeleteDelicious - AND puts hair on your chest! Pun most definitely intended.
DeleteRiver , u have done it again ,humorously. Unique name btw
DeleteThis sounds too exhausting and stressful for a sloth like myself, but I'd have to say with great enthusiasm that you NAILED IT! The rolls are perfect looking, and must have tasted fantastic as well, because they couldn't look that good and not BE good. Impressive.
ReplyDeleteThank you! I am pretty slothy myself, and I must say that if this was baked as a giant loaf of bread it would be pretty easy and laid back. It's the cutting and separating of the rolls that feels like a big chore. I just had an idea! Maybe next time I'll just have them rise inside muffin tins, then flip them over on the baking stone for a hands-free roll-baking experience. Oh, that is SO happening.
DeleteHmmm. I have this terrible vision of the rolls refusing to come out of the tins. Can you just leave them in the tins and place the tin on the stone? Probably not, but it's a thought.
DeleteI wonder why we couldn't just do that. We're not supposed to over-handle the dough, and that would certainly require the least amount of handling. I think it's time to test this theory with a mini batch.
Delete