
Follow this link for more vegan Halloween recipes!
Good eeeeevening, fellow vampires and witches! OK, I know it's only noon, but good afternoooooon doesn't sound quite creepy enough. Halloweegan is here! YAY!
It has been two years since the original Halloweegan. An emo vampire bit me last year and I was too *meh* to do anything. I am now older and rustier, and unfortunately not quite as insane as I was then, but this month will still be 100% dedicated to creepy cuteness! Because I am old and rusty, and because Vegan MoFo is going to take place in November this year, I won't be blogging every single weekday. My goal is to blog three times a week (Monday, Wednesday, and Friday) but if my rustiness makes me feel too overwhelmed I will probably reduce the crazy to twice a week. But I'm aiming for full on crazy!
If you make your own Halloweegan goodies, please send me a link so I can add your creepy cuteness to the main Halloweegan page. I even made a Halloweegan flickr group that you are all more than welcome to join.
Let's do it! Let's get eeeeveeeeeel! Mwahahahaha *cough cough* mwahahahaha!
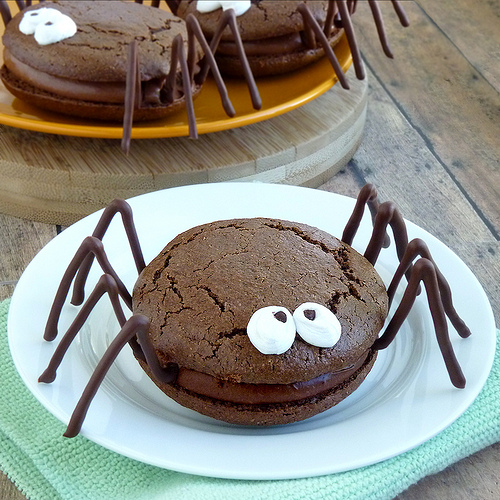
Creepy crawlies!
| Leggy Whoopie Spiders (Gluten-Free and Soy-Free) For the whipped ganache: 1/2 cup full fat coconut milk 1 tbsp maple syrup 1 tsp vanilla 7 oz semi-sweet chocolate chips (it's about one heaping cup) 1. Bring the coconut milk and maple syrup to a boil and immediately remove from heat. 2. Add the vanilla and the chocolate chips and whisk as if your life depended on it! The chocolate should melt completely and it should become lovely and smooth, but if it's not happening you can warm it up for a few seconds while stirring or whisking constantly. Watch it carefully, burnt chocolate is the only type of chocolate that sucks. 3. Refrigerate for a couple of hours or until it's completely cold. We will whip it later... For the cookies: 1/2 heaping cup rolled oats 1/4 heaping cup dried unsweetened coconut flakes 1/2 cup ground turbinado sugar or white sugar 2 tbsp tapioca starch 1/4 cup unsweetened cocoa powder 1 tsp baking powder 1/4 tsp baking soda 1/4 tsp salt 1/2 cup full fat coconut milk (at room temperature) 1/4 cup smooth peanut butter or other smooth nut butter 1 tsp vanilla extract 1/4 tsp almond extract (optional) 1. Preheat the oven to 375 degrees F and spray a baking sheet with cooking spray. 2. Grind the oats and the coconut in a blender or food processor. I use my Magic Bullet with the short blade base. Sift them into a medium size mixing bowl. There will be a couple of tablespoons of gritty bits left in the sifter that you will discard, which is why you will need heapingness when you measure the oats and the coconut. 3. Add the sugar, tapioca, cocoa powder, baking powder, baking soda, salt, coconut milk, peanut butter, vanilla, and almond extract. Beat with an electric mixer for about 30 to 45 seconds. 4. Use a medium size (1.5 tbsp) cookie Scoop to drop one cookie onto the baking sheet and watch it for a few seconds. The soft batter should barely flatten itself on top, but it shouldn't spread more than a couple of millimeters. If it spreads too much. add a little more ground coconut. If the top doesn't flatten at all add a little more coconut milk. Don't worry about over mixing these, it's OK! When you're happy with your batter, scoop the rest of it onto the baking sheet leaving a couple of inches in between cookies. 5. Bake for 12 minutes. Gingerly remove the cookies from the oven without banging the baking sheet against the oven walls or rack or they might *de-poof*. Let them sit on the sheet for five minutes. Use a thin metal spatula to transfer the cookies to a cooling rack and let them come to room temperature. To assemble the cookies: 1. When the ganache is cold and the cookies are at room temperature, use an electric mixer to whip the ganache. Beat on high for about a minute or until it looks soft and fluffy and the color changes from dark brown to a lighter brown. If it's too hard and it's refusing to whip, add a tablespoon of coconut milk. It shouldn't be too soft though, or it won't stay put between the cookies. 2. Test the ganache on a cookie: grab a cookie bottom-side-up, scoop a generous amount of whipped ganache on top, and top it with another cookie bottom-side-down. Gently press down the top cookie just a little to help the ganache spread toward the sides. If it spreads out too much and it runs down the sides of the bottom cookie, add 1 tablespoon of sifted powdered sugar plus 1/2 tablespoon of sifted unsweetened cocoa powder to the rest of the ganache and keep beating until well combined. Keep adding sugar and cocoa powder until it's firm enough. That's it! Finish the rest of the cookies and move on to the fun part - leg making! To make the legs: 1. Set up your leg making station. Print out the leg pattern and tape it to a chopping board. Tape a piece of wax paper on top of the pattern, just big enough to cover it. 2. Melt about 1/3 cup of semi-sweet chocolate chippers in the microwave in a dry glass bowl. It took my microwave 90 seconds on medium power, stirring every 30 seconds, to melt the chips completely. Transfer the melted chips to a small ziploc bag and cut the tip off one of the bottom corners. Just a small cut, no more than three millimeters. 3. Ready? Fun! Squeeze the melted chocolate out of the little opening and onto the wax paper, drawing the legs as you squeeze. I knew this would be hard for me to explain, so I made a video of my hands making the spidery legs. Instead of dragging the chocolate against the wax paper, squeeze it out from about a half an inch above the paper and let the stringy chocolate fall on it as you draw the legs. See? I told you I wouldn't be able to explain it! The video should help, it's right below the recipe :) 4. Take the whole chopping board to the freezer and let the chocolate harden for about five minutes. Remove from the freezer and gently peel off the legs using a thin metal spatula. Transfer the legs to a compulsively dry large plate. Repeat until you've made enough legs for 6 spiders. 5. Working quickly, because those legs will melt in your fingers if you dilly-dally, insert four legs into a side of one spider's creamy filling (insert the shortest tip into the filling) and four more legs into the opposite side. You'll notice that the pattern pint-out has four legs facing one way and four legs facing the opposite way, that is so that no legs look flat from the front. Are you tired of working on them or do you want to add eyes to them? You do? Awesome! Combine 1/4 cup of powdered sugar plus 1/2 tablespoon of water and stir until well combined. It should be rather stiff, but if it's crumbly you can add a few more drops of water until it complies. Use a little ziploc bag with a cut-off corner again to squeeze the little eyes onto the tops of the spiders. At this point, you probably have a little leftover chocolate from all the leg making, use a toothpick to drop a tiny drop of chocolate in the middle of each eye. Warm up the chocolate in the microwave for a few seconds (though not in the ziploc!) if it's too hard. Now we're all done! Phew! This adventure makes 6 (3 inches wide) Whoopie Spiders! :) Notes: * You can definitely use a spoon instead of a cookie scoop to drop the batter onto the the baking sheet, but the cookies won't be as round and neat. * I will most likely add more notes as I will probably remember more tips later! :) * EDIT: Yep, I remembered something else. The edges might not seem soft enough for whoopie pies, but the whipped filling softens them up. |
Can't see the video? Watch it here!

Googly eyes!

Extreme leg close-up. Same legs, different whoopie pies.

You want? :D

Inside shot of the cakey goodness.
There it is! My first official Halloweegan post of 2010. I can't believe it's already here! See you guys next Monday! *POOF* (That was me magically disappearing, by the way.)
Follow this link for more vegan Halloween recipes!
Yay! Happy Hallow*SQUEEEE*gan!
ReplyDeleteWhat an awesome first post, your Whoopie Spiders are so very cute and yummy looking.
I always thought my cat was weird for eating spiders but I would totally eat one if they were chocolatey and delicious like yours!! ;P
I love the videos you make too <3
And the flickr group is a great idea, I can't wait to see if other peeps join in the fun.
I am so excited that Halloweegan 2010 has begun! :D
You seriously have the BEST Halloween and ANY holiday goodies :)
ReplyDeleteOh, god, best idea ever. Those spiders are such cuties! I'd love to rip the legs off one and eat the head last. It's the humane way of going about these things. ;)
ReplyDeleteEeee Halloweegan! And look at those little leggies--how cute can you get?!
ReplyDeleteVerrry cute.
ReplyDeleteOh my gosh, they're SO cute! The whipped ganache sounds incredible.
ReplyDeleteHalloweegan! wahooooooooo! and imagine me hugging you RIGHT NOW, River! your leggy whoopie spiders are not only ADORABLE & FUN, but gluten-free, too! ooooooh, yay! you are the absolute best, River - you really are, my friend! and might i add that i too am most excitedfaced about veganmofo! :)
ReplyDeleteWhat a fun treat! That would be the perfect entry for our Halloween Recipe Contest! You can read more about it here. I hope you decide to enter it!
ReplyDeleteSeriously. You have the BEST holiday treats! So creative and cute, and they look absolutely delicious!!
ReplyDeleteI can't believe it's October already but YAY for Halloweegan!!
What an awesome return to Halloweegan!
ReplyDeleteNot only are these adorable, the recipe sounds delicious too! I can't wait to make these!
ReplyDeleteI wouldn't worry too much about having lost any of your craziness over the last two years. You haven't. :D Spiderific!
ReplyDeleteThis might be coolest thing I've seen all day. No, wait. It IS the coolest thing I've seen all day!
ReplyDeleteAn emo vampire, hehe!
ReplyDeleteOh my gosh...coconut, chocolate, PB...AND they're frickin adorable? Love it!
yay yay yay! halloweegan! love the whoopie spiders-too cute :)
ReplyDeleteHoly spider legs batwoman! I am enchanted! Not only that the gluten free part is great! Loved the video on making the spider legs. I will have to make these this year. Thank you.
ReplyDeleteYay for Halloweegan! I'm so excited for all your ideas. This one looks so yummy and fun!
ReplyDeleteLOVED THEM!! Can't wait to do this next weekend. One question, is there a substitute for tapioca starch? Can I just use cornstarch or will it affect the recipe too much?
ReplyDeleteSarah
These are SO cute!!!! and I really admire the healthy take on them!
ReplyDeleteThese spiders are soo cute- you aren't old and rusty at all. I am looking forward to all your awesome upcoming halloweegan posts muchly.
ReplyDeleteaww, i wish all spiders were this adorable! i'm excited to see the rest of your halloweenie creations!
ReplyDeleteThese are too cute! Adorable! AND gluten free?! You are a Halloweegan GENIUS! And that ganache doesn't sound too shabby, either. Oh, yum, wishing I could eat a few spiders right now. Yay for Halloweegan! :D
ReplyDeletePS Rusty ain't so bad. One is less impulsive when one moves more slowly. ;)
Thanks so much, guys! It's good to know I'm still considered crazy! :D
ReplyDeleteI think we can all agree with Megan - we should rip the legs off and eat the head last. It's the most humane way! :P
I haven't made them with cornstarch instead of tapioca starch, Sarah, but let me know how they work out if you try them like that!
*POOF*
hahahahaahha! I love halloween! :)
ReplyDeleteYAY! It's Hallowweeeeeeegan time!
ReplyDeleteAdorable whoopie spiders - the name alone makes me snarf!
Oh wow!!!
ReplyDeleteLove these!
So cute and such a good idea!
The inside looks really yummy too!
Those are sooo cute! I can't wait to see what other Halloweegan treats you come up with.
ReplyDeleteJust saw you were on Tastespotting. Good stuff! I was like, I know those creepy crawlies! Happy Halloweegan!
ReplyDeleteSuper cute. I can't believe I'm saying that about spiders, haha. I think its the cute cartoony eyes that I like best (as opposed to real spiders with eight *shudders* :P).
ReplyDeleteThese are the cutest, yummiest whoopie pies ever!
ReplyDeleteHOORAY, Halloweegan is here!!! What a great start too, SO frickin' cute!
ReplyDeleteAmazing! Those are so cool!
ReplyDeleteRiver, there is no reason anybody should be this talented! :)
ReplyDeleteWhat a fun and great recipe! I just had to feature it on my blog!
ReplyDeleteHappy Halloween!
http://www.thecleaneatingmama.com/2010/10/what-spooktacular-time.html
Those are so cute!!
ReplyDeleteI ab-so-lute-ly loveeee your blog and this post is another favorite of mine. You photos are so fun too. I've been reading for over an hour now and I've loved every minute of it. Thank you!
ReplyDeleteThis is the bomb...
ReplyDeleteThank you for posting this recipe. I made it last week as a trial run for my son's class party this week. Did you use sweetened or unsweetened coconut? I used sweetened but had a little difficulty grinding it into flour. I started off using an electric mini-processor. When that didn't work well, I switched to my generic "Bullet." It worked better, but when I needed more to thicken the batter, I eventually gave up and just ground up more oats. I don't mean to sound negative. The cookie was delicious and my 6 year old loved it, too. I was wondering if I used the wrong coconut or if you have any suggestions for making the coconut/oat "flour" mixture easier. Thanks so much!
ReplyDeleteI'm sorry your cookies were so troublesome, Shannon! I find that my Magic Bullet will grind the oats and the coconut together quite well with the flat blade. I used to have a mini-processor a few years ago, and that thing did not grind anything very well. Thanks for asking if I used sweetened or unsweetened coconut though, because I should have mentioned that when I posted the recipe! (I am updating the post to add "unsweetened" coconut)
DeleteI haven't made these since 2010, so I think I will make a batch just in case anything else needs to be updated. Watch this space! :)
OK, I made the little cookies and this time it took me almost twice the amount of coconut milk! Ever since we moved I've had to adjust all recipes for baked goods - and we didn't even move that far or somewhere with a completely different climate! So weird. Anyway, I am editing the recipe so that we start with just a little bit of coconut milk, and then we keep adding it as needed - that way it shouldn't be necessary to grind any additional coconut. Hopefully that will make it easier! :)
DeleteLove these – I thought everyone tried these already for some reason. But I’d forgotten about them, so thanks for making them again!
ReplyDelete